
Puh, was für eine Hitzewelle! Und dabei an Weihnachten denken fällt mir gerade ziemlich schwer. Daher von mir keine lange Vorrede – hier kommt die Anleitung zum Tartan X-Mas QAL. Ich übergebe das Wort wieder Karine:

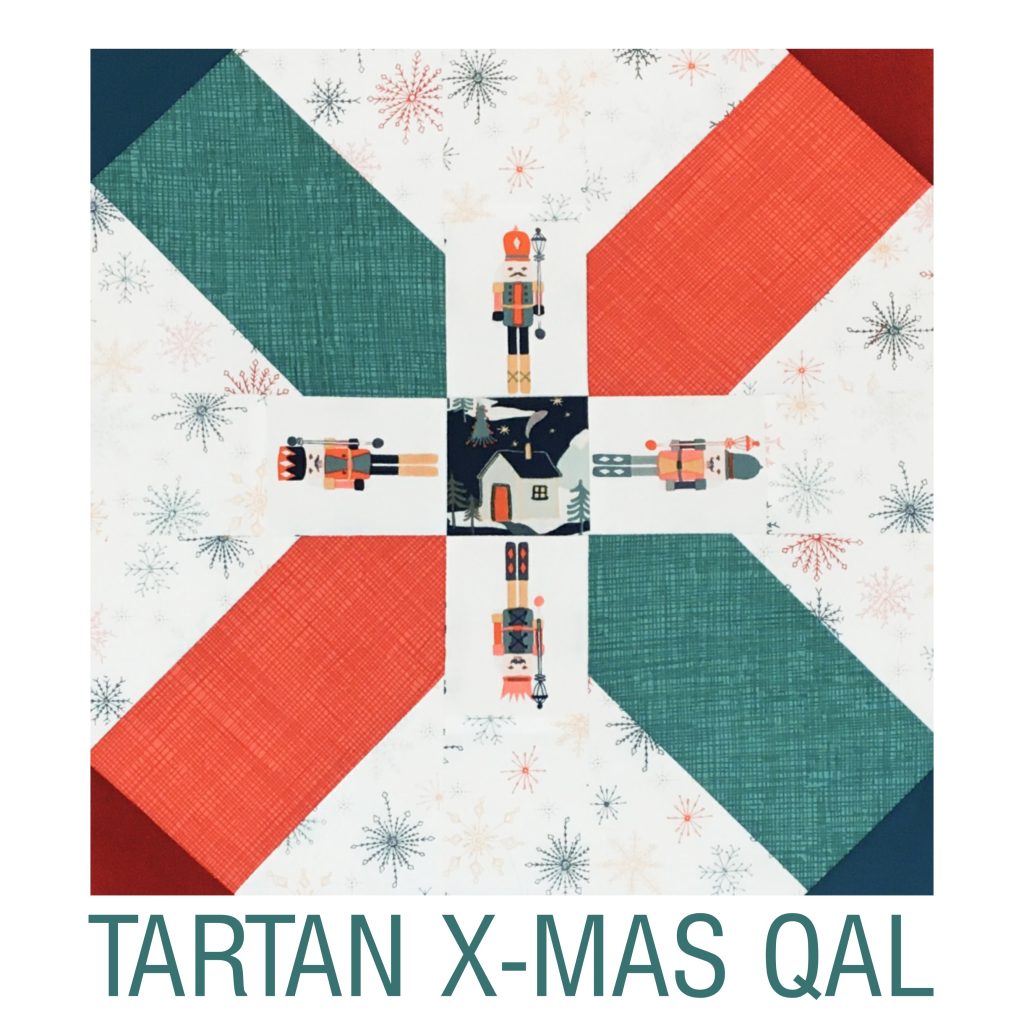
Tartan X-Mas QAL – dazu gibt es heute gleich zwei Anleitungen: die für den Tartan Double Cross Block von Karine und von Kirstin aka @augusthimmel die für die scrappy Variante!
Tartan X-Mas QAL – today you get not one, but two instructions on the how-to: the regular one for Karine’s Tartan Double Cross and Kirstin’s (@augusthimmel) scrappy one!
Farbtheorie
Color Theory
Wenn Ihr noch überlegt, welche Stoffe und Farben Ihr für Euren Quilt nehmen sollt, möchte ich vorab noch kurz über Farbwerte sprechen. Wenn Ihr nämlich den echten Tartan-Web-Effekt wollt, muss der Farbwert stimmen und es gibt nur ein relativ schmales Fenster dafür. Bei der Wahl des Stoffes für die Flip-over-Dreiecke müsst Ihr Euch überlegen, welche Farbe sich ergeben würde, wenn die Farben der X-Schenkel übereinander gemalt würden. Vermutlich ist das eine dunklere oder eine neue (aus Blau und Gelb wird Grün, aber aus Grün und Rot wird… – na, was meint Ihr?). Wenn Ihr einen helleren Farbwert wählt, wird das Quadrat, das sich beim Zusammennähen der Blöcke am Ende bei den Flip-over-Dreiecken ergibt, eher hervorstechen, aber keinen Tartan-Effekt ergeben. Das kann gewollt und sehr schön sein, wie Ihr bei einigen Paten-Versionen seht.
If you’re still thinking about the fabrics and colours for your quilt, let’s speak a bit about colours and tones. This is quite vital if you aim for a real Tartan effect. To find the right colour for the flip-over triangles, imagine the colours of the X meeting in one point. Which colour would that meeting point be? Probably a darker one. Or a new one (blue plus yellow à green, but green and red à what do you think?). If your flip-overs are lighter than the X, you won’t have a Tartan effect but little squares popping out of the lines in the end. Which can be very pretty and wished for as you can see in the versions of some of the Godmothers.
Anderer Block – gleicher Effekt
Different block – same effect
Am Beispiel der Blöcke, die mir meine Bee Mates der #missionBEEpossible im Dezember genäht haben, seht Ihr, welche Farbkombinationen einen Webeffekt ergeben und welche weniger. Wenn z.B. zwar ein dunklerer Wert für das Flip-over, also den Treffpunkt der Farben, gewählt wird, der aber aus einer ganz anderen Familie kommt, fällt das auf. Auch, wenn es zu dunkel ist. Oder zu hell, wie gesagt. Für den optimalen Tartan-Effekt braucht man also einen Ton, der sich absetzt, dunkler ist, aber keinen zu harten Kontrast bildet zu den X-Schenkeln und aus der selben bzw. passenden Farbfamilie kommt.
The image below shows the blocks I got from my bee mates of the #missionBEEpossible last December. You can see that some combinations work really well for the aimed-for Tartan effect. If the colour for the meeting point is too dark or too different (or too light), it doesn’t work too well. So what you need is a colour that has some, but not too much contrast to the X but comes from the coordinating colour family.

Tartan Double Cross – Anleitung
Für einen Quilt von ca. 1,50 x 1,80 m braucht Ihr 30 Blöcke. ( 60“ x 70“)
You need 30 blocks to make a quilt of 1,50 x 1,80 m.
Zur besseren Übersicht hier nochmal das Schema für einen einzelnen Block.
For a better overview, here again is the scheme for a single block.


1. Das Plus nähen
Piece the plus
Alle Teile A und D zusammennähen. Nähte zum Plus bügeln. Jeweils eine AD-Kombination rechts und links an Teil C nähen, Nähte auseinander bügeln.
Piece all fabrics A and D together. Press seams towards the Plus. Piece one AD on the right side of C, one on the left side. Press seams apart.

2. Das X nähen
Piece the X
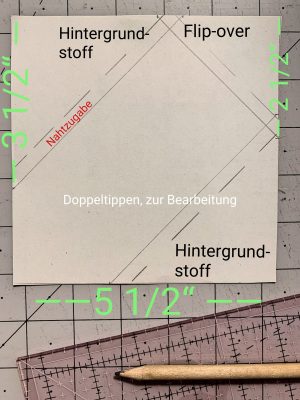
Auf der Rückseite der Quadrate B mit wasserlöslichem Stift eine diagonale Linie von Ecke zu Ecke einzeichnen. Die Quadrate B auf die 4 Quadrate E auflegen. Auf der äußeren Kante der eingezeichneten Linie nähen (so vermeidet man zu kurze Flip-over-Ecken), dann in einem Abstand von ¼“ nach außen das nicht benötigte Dreieck abschneiden (siehe Bild). (Ihr könnt vor dem Abschneiden noch eine weitere Naht in ½“ Abstand nach außen versetzt nähen, dann habt Ihr gleich ein HST geschaffen!) Die Hintergrund-Dreiecke nach außen klappen und vorsichtig die Nahtzugaben mit dem Bügeleisen auseinander pressen (nicht hin und her bügeln, der Stoff kann sich sonst an dieser Stelle verziehen).
With a water soluble pen, mark a diagonal line on the back side of each square B. Place the squares B on the squares E. Sew along the outer edge of the marked line (that way you avoid triangles are too short). Cut off the triangle, leaving a ¼” seam allowance. (If you sew a second line ½” apart, on the outer side of the first, you get a beautiful HST!) Flip over the background triangles and press the seams carefully apart.


3. Die Tartan-Elemente nähen
Sew the tartan elements
Alle Teile des Blocks auslegen, auf die Richtung der X-Schenkel achten. Auf der Rückseite der Quadrate F jeweils eine diagonale Linie von Ecke zu Ecke einzeichnen. Auf die äußeren Ecken der X-Schenkel-Blockteile legen (wenn Ihr mit zwei verschiedenen Farbrichtungen fürs X arbeitet, hier gut aufpassen, dass die Flip-overs auf den richtigen X-Schenkeln landen!) und wieder auf der äußeren Kante der Linie nähen. Im Abstand von ¼“ nach außen das nicht benötigte Dreieck abschneiden. (Ihr könnt vor dem Abschneiden noch eine weitere Naht in ½“ Abstand nach außen versetzt nähen, dann habt Ihr gleich ein HST geschaffen!) Das übrige Dreieck nach außen pressen.
Lay out all parts of the block, pay attention on the direction of the X lines when using a directional fabric. Mark a diagonal line on the backsides of all squares F. Place on the outer corners of the X lines. (If you work with two different colour families, place the squares F of colour family 1 on the X of colour family 1.) Sew along the outer edge of the marked line. Cut off the triangle, leaving a ¼” seam allowance. (If you sew a second line ½” apart, on the outer side of the first, you get a beautiful HST!) Flip over the remaining triangle and press.


4. Den Block fertigstellen
Finish the block
Die Teile wieder wie im Bild auslegen und dann zunächst die oberen X-Schenkel an die AD-Kombination nähen, dann die unteren X-Schenkel an die untere AD-Kombination. Nähte auseinander bügeln. Zum Schluss die drei Reihen aneinandernähen, Nähte wieder auseinander bügeln.


Der Block sollte jetzt 12,5“ x 12,5“ groß sein.
Lay out all pieces again as shown. Piece together the X-parts to the AD-combination of the upper row, the of the lower row. Press seams apart. Piece the three rows together. Press seams apart.
The block should measure 12,5” x 12,5” by now.


5. Auslegen der Blöcke
Lay out the blocks
Wenn alle Blöcke fertig sind, könnt Ihr mit dem Muster spielen: Wenn Ihr die X-Schenkel mit zwei verschiedenen Farbrichtungen genäht habt, ergibt sich durch Drehen jedes 2. Blocks ein großes Tartan-Muster (Reihe 1: Block 2 und 4 drehen, Reihe 2: Block 1 und 3 und 5 drehen usw.).
Now’s the time to play! If you have two colour families for your Xs, try turning every other block to get a giant Tartan pattern (Row 1: turn block 2 and 4, Row 2: turn block 1 and 3 and 5, and so on).
6. Zusammennähen der Reihen
Piecing the rows
Wie üblich näht Ihr auch beim Tartan X-Mas erst die Blöcke zu Reihen und dann die Reihen aneinander. Wichtig ist hier allerdings, richtig gut zu stecken! Damit die Flip-over-Dreiecke nämlich wirklich ein schönes kleines Quadrat und damit einen überzeugenden Tartan abgeben, müssen die Blöcke dort genau passen. Also: Nicht nur eine Stecknadel nehmen, nicht nur zwei, nein: drei! Eine kommt genau durch die beiden Treffpunkte von Flip-over und Naht, dann kommen rechts und links davon Stecknadeln, um diese Höhe zu halten. (Ok, geschrieben ist das vielleicht schwer verständlich – dazu gibt es dann in der entsprechenden Woche des QAL noch Detailbilder…). Vollbracht? Dann wieder gut auseinander bügeln, das hilft dann auch bei restlichen kleinen Ungenauigkeiten an den Treffpunkten der Flip-over-Dreiecke.
Fertig ist das Top!!
Piece the blocks to form rows and the rows to get the quilt top – that’s not a surprise, I guess. But… Please do pin! I mean, pin a lot! You want the Tartan elements to meet really precisely and not have a wonky Tartan. Take one pin to hold together two meeting points. Pin right next to this on both sides to keep these points right together. (Ah, not that clear?! I know, it’s difficult to describe with words. There will be photos for this step when we come to it in the QAL!) Got it? Then press all seams apart. This might help with tiny wonkiness at the meeting points of the flip-over triangles.
Wow! The top is done!
Habt ihr noch Fragen zu dieser Anleitung? Ich steh für alle Fragen für euch bereit!
Do you have any questions about this tutorial? I’m ready to answer all your questions!
Karine
Scrappy Tartan Double Cross
(a version by Kirstin @augusthimmel)
Als Patin für den scrappy Tartan X-Mas Quilt möchte ich Euch zeigen, dass es problemlos möglich ist, diesen Quilt in einer scrappy Version zu nähen und dabei auch kleine Reste und schmale Streifen in vielen verschiedenen Farben und Designs zu verarbeiten.
Ich habe dazu die Nähreihenfolge etwas geändert und die Teile einiger Blöcke in FPP (Foundation Paper Piecing) genäht.
Being the Godmother of the Scrappy Tartan X-mas Quilt, I want to show you how little it takes to make this pattern scrappy and use up even tiny bits and stripes in many different colours and designs. I changed the order of sewing a bit and went FPP (Foundation Paper Piecing) for some parts of the blocks.
Auch für meine Version habe ich als erstes ein Farbkonzept festgelegt: Hintergrund einheitlich aus einem Low Volume Stoff und die Plusse in verschiedenen roten Stoffen.
Die Farben für die X-Schenkel und die Flip-over Dreiecke haben sich erst während des Nähens ergeben.
I decided upon the colour concept first, just like with the regular version: one single low volume fabric for the background, the plus signs in different red fabrics. The colours and fabrics for the X and flip-overs had to wait for later.
Scrappy Start
Zuerst habe ich alle Stoffe, die ich für die X-Schenkel verwenden wollte, sortiert und aus den größeren Stücken so viele 5 1/2“ Quadrate zugeschnitten, wie möglich.
Next, I took out all the fabrics for the X, sorted them by colour and cut as many 5 ½” squares as possible.
Um die übrig gebliebenen Scraps verwenden zu können, habe ich mir aus Papier einige 5 1/2“ Quadrate zugeschnitten und darauf die Ecken für den Hintergrundstoff und die Flip-over-Dreiecke eingezeichnet.
To work with the remaining scraps, I cut some 5 ½” squares from paper and drew the triangles for the background and flip-over triangles.
Darauf werden Scraps in verschiedenen Anordnungen nacheinander aufgenäht. Es empfiehlt sich eine kurze Stichlänge zu nehmen, damit sich das Papier später einfacher heraustrennen lässt. Es muss dabei nur der mittlere Teil mit Stoff bedeckt werden. Die eingezeichneten 3 Ecken können frei bleiben. Wichtig ist, dass die aufgenähten Scraps mindestens 1/4“ über die markierten Linien für die Ecken hinausgehen, um später genügend Nahtzugabe zur Verfügung zu haben.
Then it’s sewing time. Sew the scraps in different combinations on the paper and remember to use a small stitch length, just like regular FPP. You only need to cover the middle part, but the fabrics need to jut out at least ¼” over the lines. That way you have enough seam allowance later.
Bei der Gestaltung gibt es verschiedene Möglichkeiten. Ich habe mich dabei an der Größe und Form meiner Scraps orientiert, um möglichst wenig Verschnitt zu haben.
There are different ways to do this. I tried to use my scraps following their size and form in order to not having to cut them.
Ein paar Beispiele:
Here are some examples:

Ich habe so viele 5 1/2“ Quadrate genäht, wie ich für meine gewünschte Quiltgröße brauchte und anschließend getrimmt (also alles weggeschnitten, was größer war als das Foundation Paper). Bei mir sahen die zugeschnittenen und FPP- Quadrate am Ende so aus:
I sewed all the 5 ½“ squares I need for my quilt. Then I trimmed everything that was bigger than my foundation paper. The trimmed FPP-squares looked like this in the end:

Jetzt erst wurden die Quadrate aus Hintergrundstoff entsprechend der Anleitung an alle X-Schenkel-Quadrate genäht.
Now I sewed the background squares onto the X, following Karine’s instructions.
Im nächsten Schritt habe ich die Plusse aus verschiedenen roten Stoffen und dem Hintergrundstoff für alle Blöcke entsprechend der Anleitung genäht.
In the next step, I pieced the plus signs for all my blocks with different red fabrics and the background fabric, just as in Karine’s instructions.
Alle X-Schenkel-Quadrate und Plusse wurden nun ausgelegt und das Layout für den späteren Quilt festgelegt. Dabei habe ich immer wieder die Anordnung geändert und verschiedene Variationen ausprobiert, bis ich mit dem Layout zufrieden war. Ich habe mich für einen Farbverlauf entschieden. Es gibt aber natürlich viele andere Möglichkeiten.
Then I laid out all Xes and plus signs and I decided on the layout for my top. I tried several options until I was happy with the layout.

Dann konnten die einzelnen Blöcke entsprechend der Anleitung zusammengenäht und anschließend erneut ausgelegt werden. Jetzt erst habe ich die Farben für die Flip-over-Dreiecke festgelegt. Dabei habe ich versucht, mit den Farben harmonische Übergänge zwischen den einzelnen Blöcken zu schaffen.
Now I pieced all the blocks and laid them out once more. Now, finally, I could define the colours for the flip-over triangles, trying to get smooth crossings between the blocks.
Zum Schluss wurden die Quadrate für die Flip-over-Dreiecke zugeschnitten und an alle 4 Ecken der einzelnen Blöcke angenäht.
At last I cut the squares for the flip-overs and pieced them to the corners of the blocks.
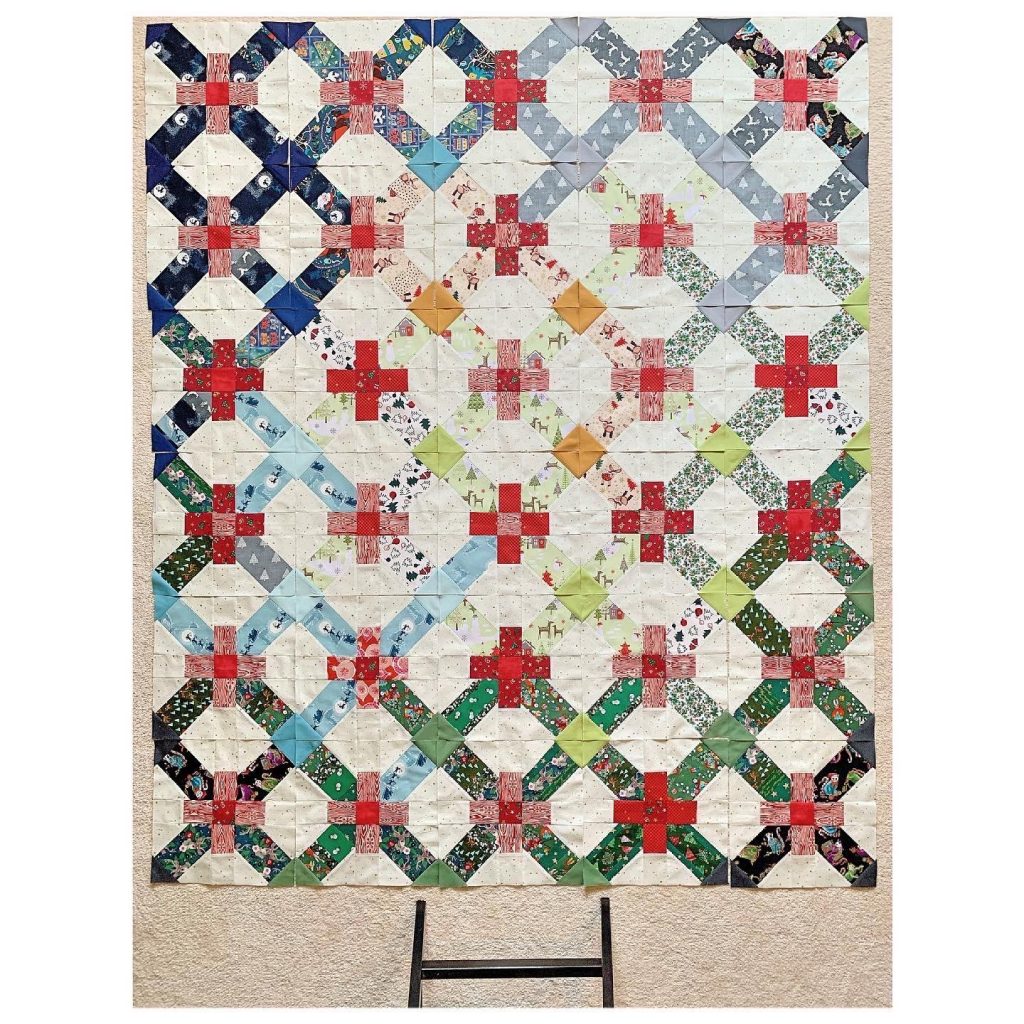
Nun sind alle 30 Blöcke für meinen scrappy Tartan X-Mas Quilt fertig!
Done! All 30 blocks for my scrappy Tartan Xmas Quilt are finished!
Kirsten
Am 01. Juli geht es los!
Nun habt ihr alles, was ihr braucht, um am 01. Juli zum Quiltalong startklar zu sein. Falls ihr noch Fragen habt: am besten hier unter dem Beitrag oder bei Karine via Instagram nachfragen.
Now you have everything you need to be ready for the Quiltalong on 01 July. If you have any questions, please ask here under the post or contact Karine via Instagram.
Ihr wollt nochmal die vorherigen Beiträge nachlesen? Dann hier entlang:
You want to read the previous articles again? Then this way:
- Einführung/ Introduction
- Stoffmenge und Rabattcode/ Fabric requirement & Coupon
- Zuschnitt/Cutting plan
Und natürlich dürft ihr gern ein Bildchen für eure Blogs und Beiträge mitnehmen:
And of course you are welcome to take a picture for your blogs and posts:


Da dieser Beitrag durch die beiden Anleitungen schon so lang geworden ist, gibt es die restlichen Farbpaten in einem extra Beitrag.
Since this post has already become so long due to the two tutorials, there are the remaining colour godmothers in an extra post.
Bleibt gesund und kreativ!
Stay healthy and creative!

Ich freue mich schon so auf den QAL und bin ganz gespannt, was für Versionen dabei entstehen werden!!
Eine sehr schön erklärte Anleitung. Die scrappy Version von @Augusthimmel ist der Hammer. Ich habe sie ausprobiert und werde das Ergebnis demnächst mal zeigen. Ich freue mich schon darauf, wenn es losgeht.
Liebe Grüße, Christiane